Microsoft Excel is an excellent tool for creating reports, visualizing data, performing complex calculations, and more. Whether you use it for personal or professional work, it can help add and manage data easily. However, you can’t do that if Microsoft Excel won’t let you type or edit cells on your Windows 11 computer

You might have trouble finishing your work when Excel won’t let you create or edit workbooks. Here are some troubleshooting tips when you can’t type in Microsoft Excel on Windows 11.
1. Check Editing Options in Microsoft Excel
The first thing you need to do is check the editing options in Microsoft Excel and ensure that cell editing is enabled. The Excel files that we download from emails or receive over Microsoft Teams may not guarantee editing privileges. That means you can only view those files but can’t edit or add new data. So follow these steps to check the Editing options for the Excel file.
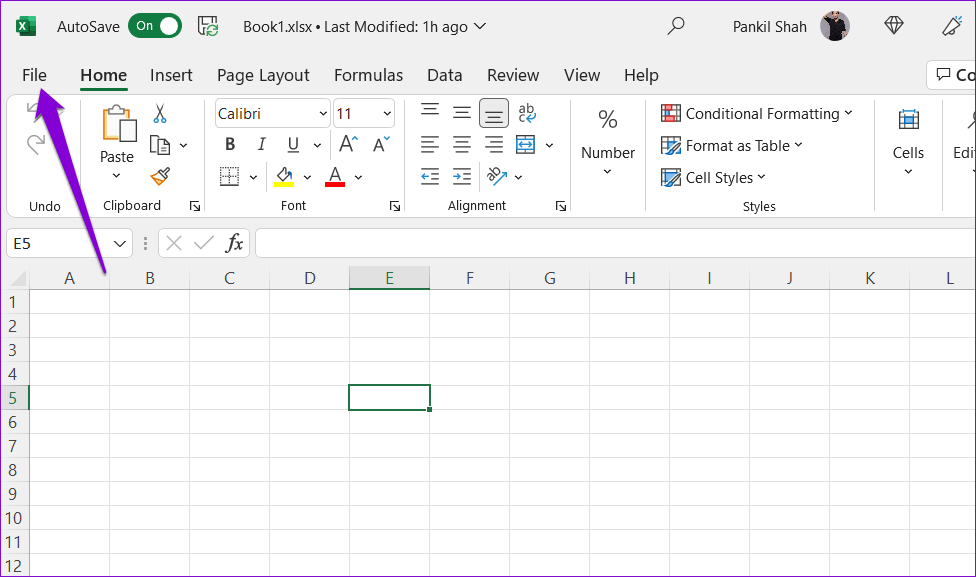
Step 1: Open the Microsoft Excel app on your computer and click the File menu in the top-left corner.
Step 2: Click on Options in the bottom-left corner.

Step 3: In the Excel Options window, navigate to the Advanced tab.

Step 4: Under Editing options, tick the checkbox that reads ‘Allow editing directly in cells.’ Then, click OK.

After this, check if you can type in Excel.
2. Unprotect Excel Workbook
Microsoft Excel allows you to protect your data at the cell, spreadsheet, or workbook level. It is most likely protected if the issue in question is limited to a specific Excel file. In that case, you’ll need to unprotect the spreadsheet to edit it. Here’s how to do it.
Step 1: Open the protected Excel spreadsheet and click the Review tab at the top.

Step 2: Click the Unprotect Sheet option and then try to edit cells again.

3. Open Excel in Safe Mode and Disable Add-Ins
Although Excel add-ins help increase productivity, they can occasionally cause Excel to malfunction on your computer. To check for this possibility, you’ll have to open Excel in safe mode, where it runs without any add-ins.
To open Excel in safe mode, press the Windows + R keys to open the Run dialog. Type excel /safe in the Open field and hit Enter.

When Excel opens in safe mode, check if you can edit cells. If this method works, one of the third-party add-ins might be to blame for the issue. To find the culprit, you can disable all add-ins and re-enable them individually.
Step 1: Open an Excel spreadsheet and click the File menu in the top-left corner.

Step 2: Click Options in the bottom-left corner.
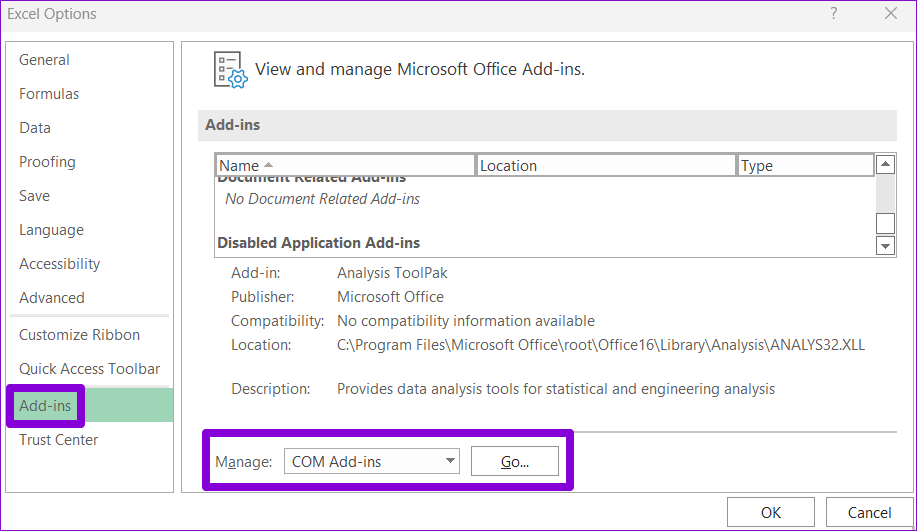
Step 3: In the Add-ins tab, select COM Add-ins in the Manage drop-down menu and then click the Go button next to it.
Step 4: Uncheck all the boxes to disable your add-ins and click OK.

Restart Excel and enable your add-ins one by one. Try using Excel after enabling each add-in to determine which one is causing the issue. When you find the problematic add-in, consider removing it or leaving it disabled.
4. Disable Protected View in Excel
Protected View is a security feature in Microsoft Excel that aims to protect your computer from potentially unsafe files. This feature may cause Excel to open your files in restricted mode, preventing you from editing or changing them. If you’re confident about the legitimacy of your Excel spreadsheet, you can temporarily disable the Protected View feature.
Step 1: In Microsoft Excel, click the File menu at the top.
Step 2: Select Options from the left pane.
Step 3: In the Excel Options window, switch to the Trust Center tab and click Trust Center Settings button in the right pane.

Step 4: Uncheck all three checkboxes to disable Protected View and click OK to save changes.

5. Repair Your Excel File
Another reason you might have difficulty typing in Excel is if the workbook is damaged. Fortunately, Excel includes a repair tool that can automatically detect and fix problems with your workbook. Here’s how to use it.
Step 1: Open Microsoft Excel on your PC.
Step 2: Select Open from the left sidebar and click the Browse option.

Step 3: Browse and select the Excel file on your computer.
Step 4: Click the downward arrow next to Open to select the ‘Open and Repair’ option.

Excel will try to repair your file and then open it. After that, check if you can type in Excel.
6. Run the Office Repair Tool
As a last resort, you can run the Office repair tool on your computer to fix Microsoft Excel. This tool can help repair issues with all your Office programs, including Excel. Here’s how you can run it.
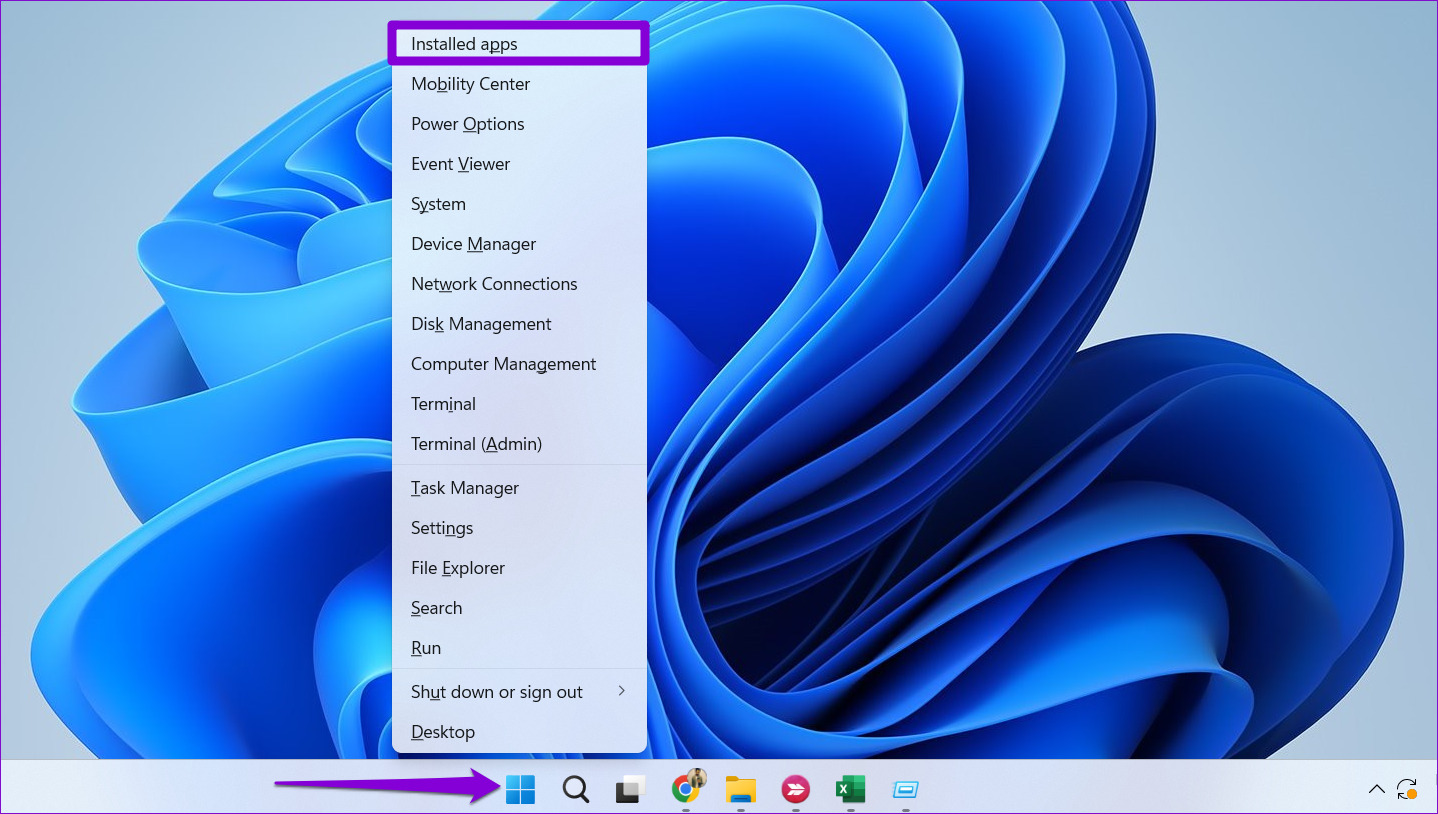
Step 1: Right-click on the Start icon and select Installed apps from the list.
Step 2: Scroll down to locate the Microsoft Office product on the list. Click the three-dot menu icon next to it and select Modify.

Step 3: Select the Quick Repair option and click Repair.

If the error persists even after this, perform an Online Repair instead. This will conduct a more thorough repair operation to resolve any issues with Microsoft Excel.
Get Back to Work
It’s no fun when Microsoft Excel starts running into problems. Hopefully, one of the above-listed solutions has proven useful, and you can edit your spreadsheets as before. However, if none of the above solutions work, you can always convert your Excel spreadsheet to a Google Sheets document and resume your work.
Last updated on 06 February, 2023
The above article may contain affiliate links which help support Guiding Tech. However, it does not affect our editorial integrity. The content remains unbiased and authentic.
DID YOU KNOW
Microsoft Edge was initially code-named Project Spartan.